How to Use a Spin Doctor Tile Leveling System for Large Format Tiles: The Definitive Master Guide
The installation of large format tiles-those with any side exceeding 15 inches-represents the pinnacle of modern tiling, offering seamless aesthetics and a luxurious sense of space. Yet, this very grandeur introduces a unique set of physical challenges: pronounced tile warpage, amplified substrate irregularities, and massive weight that stresses traditional methods. In this high-stakes environment, the Spin Doctor tile leveling system has emerged not merely as a tool, but as a specialized engineering solution designed to conquer the specific forces at play with large slabs. Unlike basic clip-and-wedge systems, the Spin Doctor incorporates a unique rotational tightening mechanism that provides unparalleled control and power. This comprehensive guide dissects the precise methodology, from substrate science to final grout, for deploying the Spin Doctor system to achieve a perfectly planar, lippage-free installation that meets the strictest industry standards for large format tile.
Decoding the Spin Doctor System: An Engineered Response to Large Format Challenges
Before engaging in technique, one must understand the tool's design philosophy. The Spin Doctor system is built around a cam-action lever mechanism, distinguishing it from hammer-driven wedge systems. This design is not a stylistic choice but a direct response to the need for controlled, high-torque application on large, rigid tiles.

Core Components and Their Synergistic Functions
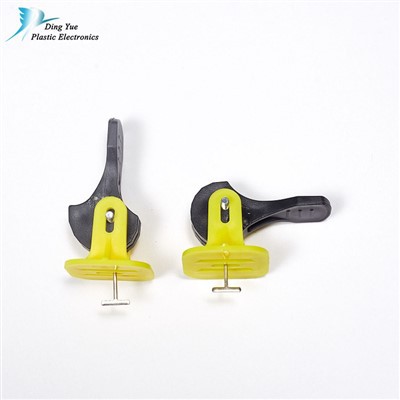
- The Base Clip (Anchor): A low-profile, high-tensile-strength plastic strap that slides under tile edges. Its design features an integrated, angled cam socket and a break-line for clean removal. It is engineered to resist the tremendous shear and pull-out forces generated by leveling large tiles.
- The Cam-Action Wedge (The "Spin Doctor"): The system's namesake. This component has a threaded post and a cam-lever head. It is inserted into the base clip and, when the lever is rotated, the cam mechanism engages, pulling the wedge downward with immense mechanical advantage. The lever provides precise tactile feedback and eliminates the impact shock of hammering.
- The Removal Tool (Optional but Recommended): A specialized wrench designed to grip the spent wedge, allowing for easy twisting and clean shearing at the break-point after mortar cure, protecting the installer's hands and ensuring consistent removal.
The Non-Negotiable Foundation: Pre-Installation Preparation
No leveling system, no matter how advanced, can compensate for a poor foundation. With large format tiles, preparation requirements are exponentially stricter.
Substrate Flatness: The 10-Foot Rule

The industry standard, per the Tile Council of North America (TCNA), mandates that the substrate for large format tiles cannot deviate more than 1/8 inch in 10 feet, and 1/16 inch in any 2 feet. Use a 10-foot straightedge to map the entire floor. Mark high spots for grinding and low spots for filling with a polymer-modified patching compound. This step is critical; a warped tile on a wavy substrate creates an unsolvable puzzle.
Mortar Selection and Application: The "Bodysuit" of Adhesion

Large, dense porcelain tiles have minimal porosity and high weight. This demands a premium, polymer-modified, large-format thin-set mortar (often denoted as LFT) with high bond strength and non-sag properties. The mortar must be mixed to a consistent, lump-free consistency that holds a notch. The application method is twofold:
- Back-Buttering (Burning In): Using the flat side of the trowel, skim-coat a thin layer of mortar onto the entire back of the tile. This "primes" the surface, breaking the surface tension and ensuring 100% adhesive coverage-a requirement, not a recommendation, for tiles over 24".
- Notched Bed: Comb the mortar onto the substrate using the trowel size specified by the mortar manufacturer (commonly a 1/2" x 1/2" square notch for tiles over 15"). Always comb in one direction to create uniform ridges.
Dry Layout and Strategic Planning
Never start with mortar. Dry-lay your entire tile field with your chosen spacers. This allows you to:
- Plan the layout to minimize cuts.
- Identify and disperse tiles with significant color or caliber (size) variation.
- Pre-mark the exact placement of every Spin Doctor base clip. For large format tiles, a minimum of 4 clips per tile (one at each corner) is standard. For tiles exceeding 24" on any side, plan for additional clips along the edges, spaced every 8-12 inches.
- Establish reference lines to maintain layout during the adhesive-setting process.
The Step-by-Step Installation Protocol
This is the core procedural sequence. Work in manageable sections, typically no larger than 10-15 square feet at a time, to prevent the mortar from skimming over.
Step 1: Mortar Application and Initial Tile Setting
Spread mortar for your first tile or small batch. Using suction cup lifters, place the first tile, using a slight sliding/rocking motion (no more than 1/2 inch) to collapse the mortar ridges and ensure contact. Do not press it below the intended plane.
Step 2: Immediate Placement of Spin Doctor Base Clips
As soon as the tile is positioned, slide the base clips under its edges at every pre-marked location. Ensure the clip's strap is flat on the substrate and the cam socket is oriented correctly (facing up and accessible). The top of the clip should be flush with or just below the top of the tile edge.
Step 3: Setting Adjacent Tiles and Engaging the System
Butter and set the adjacent tile. It will rest on the shared base clips. Immediately insert the Spin Doctor wedge into the base clip socket between the two tiles.
The Art of the "Spin": Tightening Technique
- Begin by hand-tightening the wedge until it makes firm contact.
- Insert the lever tool (often a 4mm hex key or proprietary driver) into the cam head.
- Apply steady, firm pressure to rotate the lever. You will feel significant resistance. The cam action will emit a distinct "click" or "pop" as it engages and advances.
- Continue rotating in controlled increments. Watch the tile edges. The goal is to see the lippage disappear and the tiles draw together, closing the grout joint evenly. The tactile feedback is your guide-stop when you feel a solid, firm resistance and the tiles are visually flush. Avoid the temptation to over-tighten. The system is designed to stop at its optimal tension point.
Step 4: Verification and Micro-Adjustment
After engaging the clips in a section, place a 6-foot or longer straightedge diagonally and across the tiles. Check for flatness. The unique advantage of the Spin Doctor is the ability to make micro-adjustments. If a slight high corner remains, a small additional turn on that specific clip can often correct it without disturbing the rest of the installation.
Step 5: The Curing Period and Clean-Up
Allow the mortar to cure for the full time specified by the manufacturer (usually 24 hours) before any traffic or next steps. Once the mortar is firm, you can snap off the Spin Doctor lever heads. They are designed to break away cleanly. Leave the remaining wedges and clips in place for the full cure.
Step 6: System Removal
After 24 hours (or as per mortar instructions), remove the system. Using the specialized removal tool or a pair of pliers, grip the exposed threaded post of the wedge. Apply a sharp twisting motion. The wedge is designed to shear at its base. A light tap with a hammer on the remaining clip strap will then break it at its notch. Remove all plastic debris from the joints before grouting.
Advanced Strategies for Complex Scenarios
Large format installations often involve complexities beyond a simple grid.
Handling Extreme Tile Warpage (Crowned Tiles)
Porcelain tiles, especially large ones, often have a slight convex bow (crown). The Spin Doctor's incremental force is ideal for this. Strategy: Place clips not just at corners, but at the midpoint of each long edge. Engage the corner clips first to establish the plane, then gradually tension the mid-edge clips. This applies a distributed force that gently pulls the center of the tile down without cracking it.
Working with Rectified Edges and Minimal Joints
For a "minimal joint" look (1/16" or 2mm), the Spin Doctor's precision is critical. Use the system-specific clips designed for that joint width. The inward pulling force of the cam mechanism ensures joints remain perfectly consistent and tight, which is paramount when any variation is glaringly obvious.
Managing Heavy, Thick Slabs (Over 3/8" thick)
The mass of these slabs requires maximum force. Ensure you are using the manufacturer's heavy-duty or "pro" grade Spin Doctor components rated for the highest tension. The rotational mechanism allows you to apply the necessary high torque safely and controllably, which would be difficult and dangerous to achieve with a hammer.
Comparative Analysis: Spin Doctor vs. Traditional Wedge Systems for LFT
| Performance Factor | Spin Doctor Cam System | Traditional Hammer-Driven Wedge System |
|---|---|---|
| Force Application | Controlled, incremental rotational torque. High mechanical advantage. | Sudden, high-impact hammer blows. Lower mechanical advantage. |
| Control & Feedback | High. Installer can feel tension build and make micro-adjustments. | Low. Relies on impact feel; prone to over/under-tightening. |
| Impact on Mortar/Tile | Minimal shock. Gradual pressure is gentler on mortar bed and less likely to crack tile. | High shock. Impact can disturb mortar bed and stress tile. |
| Ease of Use on Stiff Tiles | Excellent. Cam mechanism excels at generating high, sustained force. | Good, but may require excessive, tiring hammering. |
| Removal Process | Clean, via twisting shear. Often easier on hands. | Requires striking or prying; can be more difficult. |
"When I switched to 24x48 porcelain slabs, my old hammer-and-wedge system just couldn't deliver the consistent pressure. I'd have one corner perfect, and the next would pop. The Spin Doctor changed the game. That clicking sound as you turn the lever is the sound of the tile moving into place. I can apply enough pressure to flatten a seriously crowned tile without feeling like I'm going to break it. For anything over 18 inches, it's the only tool in my truck now." – Lena Vargas, Commercial Tile Contractor
Preventative Troubleshooting and Problem-Solving
Even with a superior system, issues can arise. Here's how to diagnose and solve them with the Spin Doctor.
Problem: Cam Lever Spins Freely Without Tightening
Cause: The wedge is not properly seated in the base clip socket, or the clip is not anchored (floating on wet mortar).
Solution: Remove the wedge, ensure the clip is flat on the substrate and mortar is the correct consistency. Re-insert the wedge, pushing down firmly as you start to turn.
Problem: Tile Cracks at the Edge During Tightening
Cause: Over-tightening, or an unseen microfracture in the tile. The tile edge is bearing directly on a clip that is not perfectly flush.
Solution: Always stop tightening when you feel solid resistance and lippage is gone. Inspect clips to ensure they are clean and properly positioned under the tile, not pushing up on a burr or imperfection.
Problem: Inconsistent Joint Width After Tightening
Cause: Uneven mortar bed height or inconsistent tightening force.
Solution: Use a notched trowel and combing technique that creates uniform ridges. When tightening Spin Doctors, work in a pattern (e.g., criss-cross) and apply even, steady turns to each, checking progress with a straightedge, rather than fully tightening one before moving to the next.
Frequently Asked Questions (FAQ)
How many Spin Doctor sets do I need per square foot for large format tile?
For tiles in the 24x24 inch range, plan for 4 sets per tile (one per corner). For larger slabs like 24x48, use 4-6 sets. This equates to roughly 1 to 1.5 sets per square foot. Always have a 10-15% surplus for contingencies.
Can the Spin Doctor system be used on walls with large format tiles?
Yes, but with strict mortar and technique considerations. You must use a non-sag mortar specifically designed for large format wall tile. The system works effectively to counteract tile sag, but the installation is more physically demanding as you must support the tile while engaging the clips. It is highly recommended for walls but requires practice and the correct mortar.
Is the removal tool necessary, or can I use pliers?
The removal tool is strongly recommended. It is designed to grip the wedge securely and provide leverage for a clean shear. Piers can slip, damage the wedge (making it harder to turn), and are harder on your hands. The tool is a small investment that significantly improves the removal process.
Can I reuse Spin Doctor wedges or base clips?
No. Both components are designed for single use. The wedges are stressed to their yield point and will shear upon removal. The base clips are designed to fracture. Reusing them compromises their strength and the system's performance, risking installation failure.
Core Principles for Mastering the Spin Doctor with LFT
- Substrate is Sovereign: Perfect flatness (1/8" in 10') is the non-negotiable foundation for any large format tile installation.
- Mortar is a Partner: Use a premium, polymer-modified LFT mortar and achieve 100% coverage via back-buttering and proper notching.
- Plan the Attack: Dry-lay everything. Map your clip placement. Work in small, manageable sections.
- Listen to the Tool: The cam lever's feedback is your guide. Use controlled, incremental turns. The goal is firm resistance, not maximum force.
- Verify As You Go: Constantly check for flatness with a long straightedge during and after tightening, making micro-adjustments immediately.
Conclusion: Elevating the Craft with Controlled Force
The installation of large format tile is a discipline that demands respect for scale, material science, and physics. The Spin Doctor tile leveling system enters this discipline as a precision instrument, replacing brute force with calibrated torque. Its cam-action mechanism provides the control, power, and feedback necessary to diplomatically negotiate with the inherent warpage and mass of large slabs, transforming a high-risk installation into a predictable, repeatable process. By adhering to the rigorous preparation standards and the methodical technique outlined in this guide, installers can harness this tool not just to avoid lippage, but to achieve a new standard of flatness-a flawless plane that allows the beauty and intent of large format tile to fully resonate. In the hands of a knowledgeable craftsman, the Spin Doctor is more than a leveling system; it is the key to unlocking the true potential of modern, large-scale tile design.
Hot Tags: spin doctor tile leveling system for large format tiles, China, manufacturers, suppliers, factory, customized, wholesale, buy